MediaHarbor Installation Guide

 System Overview
MediaHarbor is a multiview service that can be easily built in "the environment desired by the customer" by using the installer provided by Traffic Sim, in both cloud and on-premises environments. You can start using it immediately by purchasing the necessary points (via invoice or credit card) from the LicenseManager accessible from MediaHarbor.
In addition to IP streams, by using Traffic Sim manufactured units, it supports input from ISDB-T, ISDB-S, QAM, and SDI, and can also descramble B-CAS, C-CAS, TRMP, and ACAS. Besides the traditional method of displaying on a large TV through a decoder, you can also view the multiview screen on client PCs, tablets, and smartphones using HLS or WebRTC, allowing you to check the multiview screen at home, outside the broadcast area, or while on a business trip. This multiview service allows you to select and distinguish audio from any stream and enlarge the display as needed.
In addition to the multiview function, we will sequentially release licenses for various functions such as Transport Stream (TS) layer monitoring, and video/audio (blackout, freeze, silence) monitoring, which are strengths of Traffic Sim. Users can immediately integrate and use these functions in MediaHarbor by purchasing the necessary licenses. We are also considering a feature that overlays alarms in cooperation with other devices, enabling the construction of a centralized monitoring environment with MediaHarbor.
Note: Descrambling requires the use of Traffic Sim manufactured units.
Note: Various monitoring functions will be released sequentially.
 Supported Codecs
 Video
Video
- MPEG-2
- H.264/AVC
- H.265/HEVC
- AV1(*)
- JPEG XS
 Audio
Audio
- AAC
- MP2
- MP3
- AC-3 (Dolby Digital)
- E-AC-3 (Dolby Digital Plus)
- Opus(*)
 Supported Protocols
- RTP Unicast (*1)
- RTP Multicast (*1)
- RTP-FEC Unicast (*1)
- RTP-FEC Multicast (*1)
- SRT Caller
- SRT Listener
- HLS (*2)
- AES67
- zixi Pull(*3)
- zixi Push(*3)
- RIST (*3)
- NDI® (*4) - NDI official website
- ST2110-22
- RTMP Pull
- RTMP Push
*1 Supports Payload type = 33 (MP2T:MPEG-2 transport stream).
*2 If the stream is switched during a commercial break or similar interruption, playback may be disrupted.
*3 Supported via AWS MediaConnect
*4 NDI® is a registered trademark of Vizrt NDI AB
 Monitoring and Analysis Features
By purchasing additional points, you can access the monitoring and analysis option features.
- Input Monitoring - Input Signal Loss (*1)
- Input Monitoring - Input Signal Low Bandwidth (*1)
- Video/Audio Monitoring - Freeze Monitoring
- Video/Audio Monitoring - Blackout Monitoring
- Video/Audio Monitoring - Silence Monitoring
- SCTE35 Analysis
- TS Monitoring - ETR290 Priority 1
- TS Monitoring - ETR290 Priority 2
- Patrol Monitoring
*1 Available for free as a basic feature.
 Operating Environment
 Hardware Requirements
- CPU: 11th Gen Intel Core i5 (64-bit) 2.40GHz 4 Cores and 8 Threads or higher
- Memory: 16GB or more
- Disk Space: 20GB or more free space
- Graphics card: None
Note
These are reference specifications for about 25 H.264/AAC input sources.
Higher specifications may be required depending on the number of input sources and codecs.
 Software Requirements
Server
OS: Linux (AlmaLinux / Rocky Linux / Ubuntu Server / Amazon Linux / Red Hat Enterprise Linux / Oracle Linux)
Warning
Does not work on Windows Subsystem for Linux.
Docker and docker-compose must be installed.
Note
If not, they will be installed when the installer is run.
Client
OS: Windows, Mac, iOS, Android
Browser: Google Chrome, Mobile Safari
 Network Requirements
- Be able to connect to the internet for license verification
- The following ports must be open
| Port Number | Protocol | Usage |
|---|---|---|
| 80 | TCP | MediaHarbor Web UI |
| 8900 | UDP | IP Tally (for UDP) |
| 9000 | TCP | IP Tally (for TCP) |
| 10050 | TCP | Zabbix Agent (Optional) |
| 10100-10200 | UDP | SRT Output |
| 42000-42100 | UDP | SRT or RTP Signal Input |
| 49152-65535 | UDP | WebRTC |
 Installation Procedure
 Obtaining the API Key
Log in to the License Management System
https://license.trafficsim.co.jp/
Note
A CastHive account is required to login to the license management system.
If you do not have an account, please register at CastHive Organization Registration.
If you already have a CastHive account and would like to add LicenseManager, please let us know through the inquiry form or by email.
Our reception is open during business hours on weekdays (9:00 AM to 6:00 PM, Japan Time).
We will confirm your application and issue an account and add the application.
Please note that it may take some time for issuance and addition.
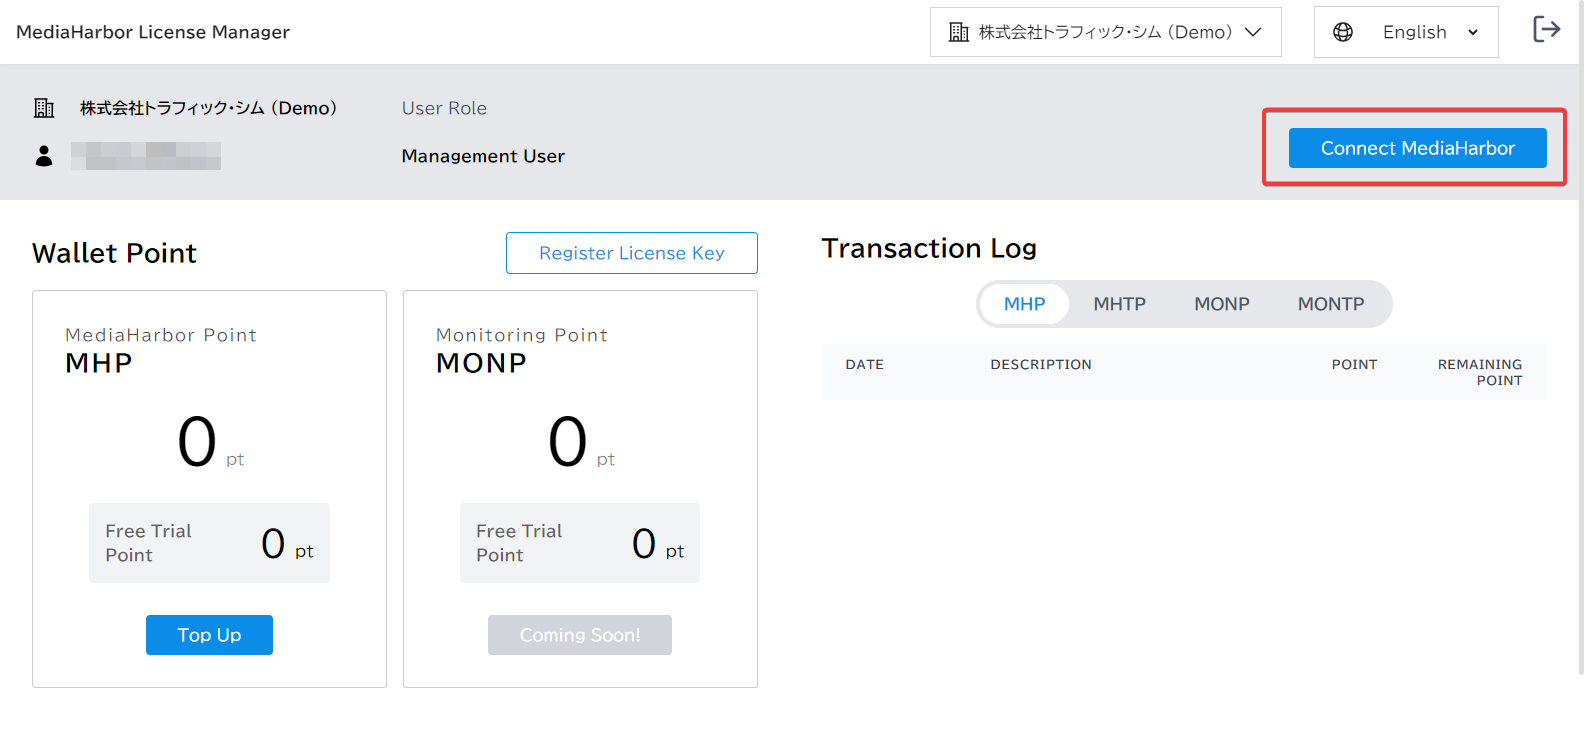
Open the MediaHarbor Management Screen
Click the "Connect MediaHarbor" button.

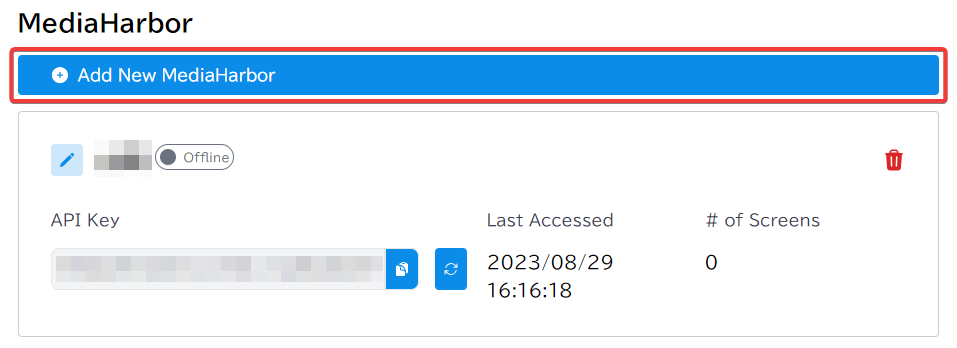
Create a New MediaHarbor API Key
Create a New MediaHarbor API Key Click the "Add New MediaHarbor" button.
Tip
Only the administrator user can perform this operation.

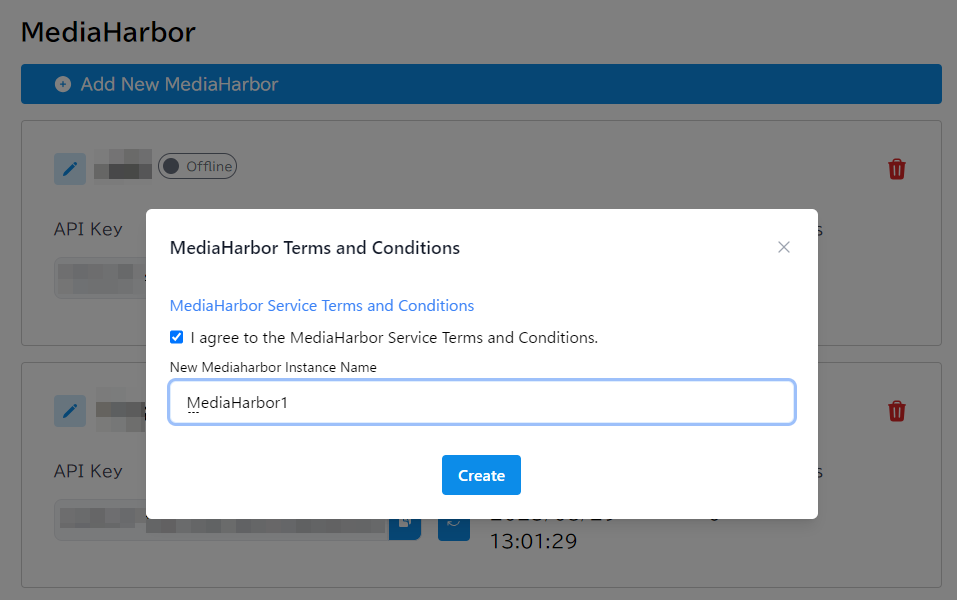
Review the terms and conditions. If you agree, check the "I Agree" box, enter New MediaHarbor Instance Name, and then click the "Create" button.

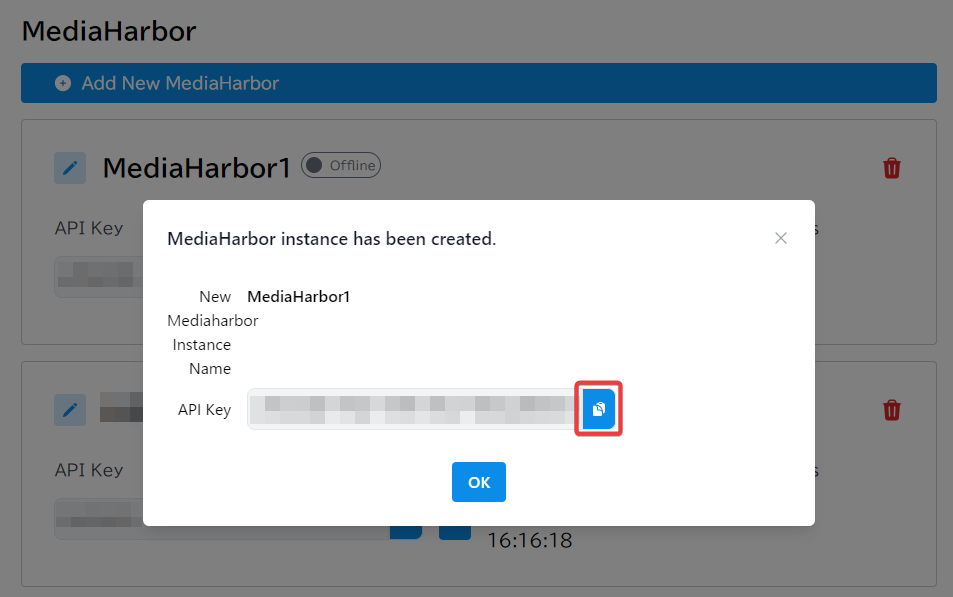
A new MediaHarbor API key will be generated. Please make sure to copy it.
Note
You can check the API key later as well. It will be needed when you run the installer.

 Installation
Execute the following steps on the target Linux server.
Download the Installer Shell Script
Run the command below:
1 | |
Grant Execution Permission to the Downloaded Shell Script
Run the command below:
1 | |
Execute the Installer
Run the command below:
1 | |

During the installation wizard, an API key input screen will appear.
Enter the API key you obtained in the previous steps.

Continue with the wizard to complete the installation.
 Troubleshooting
If you encounter any issues, please try the following steps:
Display shows "Error response from daemon: toomanyrequests: Rate exceeded"
- There's congestion when retrieving the Docker image. Wait for a while and then re-run the installer shell script.
Unable to Pull Container Image via Proxy
- Docker Daemon Configuration
You'll need to add the proxy settings to the Docker daemon.
Create anhttp-proxy.conffile inside the/etc/systemd/system/docker.service.d/directory.
1 2 | |
Add the following content to the file:
1 2 3 4 | |
Replace your-proxy-server with the hostname or IP address of your proxy server.
- Reload Docker Daemon
To apply the changes, reload the Docker daemon.
1 2 | |
Unable to install due to other displayed errors
- You might be running out of storage space. Please check your available storage.
- If an error message appears while executing the installer shell script, record that message and contact support.
Installation completed but unable to access
- Ensure Docker is running correctly. Execute the following command to verify that Docker is functioning properly:
1 | |
If it's working correctly, you'll see a list of running containers.
If nothing appears or an error message is shown, recheck your Docker installation and settings.
1 2 3 4 5 6 7 | |
- If installed on a cloud service, please check the security group settings.
- Ensure the ports mentioned in Network Requirements are open.
Can be played with regular latency, but not with low latency.
- In a NAT traversal environment, if the global IP address changes after installation, WebRTC connectivity will be lost.
Run
installer.shagain to update the settings with the current global IP address.
Cannot play when a high-bitrate stream is input.
- Open the advanced settings of the input source and increase the probe size setting.
Unable to Receive Multicast Signals in an IGMPv2 Environment
How to Configure IGMPv2
On Linux, IGMPv3 is often enabled by default, but some multicast environments require switching to IGMPv2.
You can change to IGMPv2 using the following steps.
1. Temporarily Apply IGMPv2 for Testing
You can switch to IGMPv2 using the following command:
1 | |
Example for receiving multicast on eth1:
1 | |
Once you confirm that multicast joins are occurring using IGMPv2, you can make this setting persistent.
2. Making the Setting Persistent
To retain the IGMPv2 setting after a reboot, add the following line to /etc/sysctl.conf:
1 2 | |
Example for eth1:
1 2 | |
This ensures IGMPv2 remains applied after a reboot.
Multicast Packets Are Received but Not Processed
On Linux, rp_filter (reverse path filtering) is enabled by default. Depending on the routing configuration, multicast packets may be mistakenly dropped.
Disabling this filter can allow proper reception of multicast packets.
1. Checking the Current State of rp_filter
1 | |
Output meanings:
1→ Strict filtering (default)2→ Less strict filtering0→ Filtering disabled
Example for checking eth1:
1 | |
2. Temporarily Disabling rp_filter
You can disable rp_filter (0) with the following command:
1 | |
Example for eth1:
1 | |
Once you confirm that multicast reception works, you can make this setting persistent.
3. Making the Setting Persistent
To retain rp_filter=0 after a reboot, add the following line to /etc/sysctl.conf:
1 2 | |
Example for eth1:
1 2 | |
This ensures rp_filter=0 remains applied after a reboot.
"API KEY MISSING or WRONG API CONFIG" message displayed over the video

- The API key you entered during installation may be incorrect.
Please runinstaller.shagain and re-enter the API key.
"NO LICENSE or LICENSE EXPIRED" message displayed over the video

- There's a possibility that the MediaHarbor server is unable to communicate with the license management system.
Please check if you are connected to the internet. - You might be running low on points.
Log into the License Management System and check if you have any points remaining.
If You Forgot the Password Set in the Security Configure Page
- First, ensure that MediaHarbor is stopped. If it is running, stop it using the following command:
1 | |
- Once you've confirmed that MediaHarbor is stopped, run the following command to reset the password:
1 | |
- After the password reset is complete, start MediaHarbor.
1 | |
Connecting MediaHarbor to the Internal Zabbix Server
- MediaHarbor has a Zabbix agent installed. By configuring the firewall to open TCP port 10050, you can add MediaHarbor to the Zabbix server and monitor it.
1 2 3 4 5 6 7 | |
How to Migrate Settings to Another Server or Backup Settings
- You can copy the entire settings by copying the DB folder.
1 2 3 4 5 6 7 8 9 10 11 12 13 14 15 16 17 18 | |
 Support Information
If the problem persists or you need further support, please reach out through the contact details below:
For conducting pilot tests in preparation for full-scale implementation, you can apply for trial points.